phlourish_icons (![[personal profile]](https://www.dreamwidth.org/img/silk/identity/user.png) phlourish_icons) wrote2008-02-11 03:25 pm
phlourish_icons) wrote2008-02-11 03:25 pm
Entry tags:
Blending Tutorial - using "add layer mask" and "feather"
Blending Images
This tutorial is for![[livejournal.com profile]](https://www.dreamwidth.org/img/external/lj-userinfo.gif) alexandral and anyone else who wants to learn how to blend images. We are going to be making a wallpaper for your desktop. Beginners are welcome.
alexandral and anyone else who wants to learn how to blend images. We are going to be making a wallpaper for your desktop. Beginners are welcome.

I'm wordy so be warned. But I think, if you're a beginner, the wordiness is helpful. But, I'll let you be the judge of that. :)
I use Photoshop CS2. You will learn how to use the "add layer mask" tool, the "Polygonal Lasso Tool" and how to "feather". I'm not sure if other graphic editing programs have the same tools, but they might have something similar. So even if you don't have Photoshop you might still be able to learn something from this tutorial or at the very least get some inspiration. I hope. :)
Beginners should be able to follow this tutorial. But, please don't look on this tutorial as a step by step tutorial. You will not be able to create the exact same wallpaper I have created. I'm going to show you where to find the tools I've used and how to use them, the rest is up to you. You can use the images I've used or use your own.
Most of the examples are linked and the graphics are reduced in size.
Gathering your photos
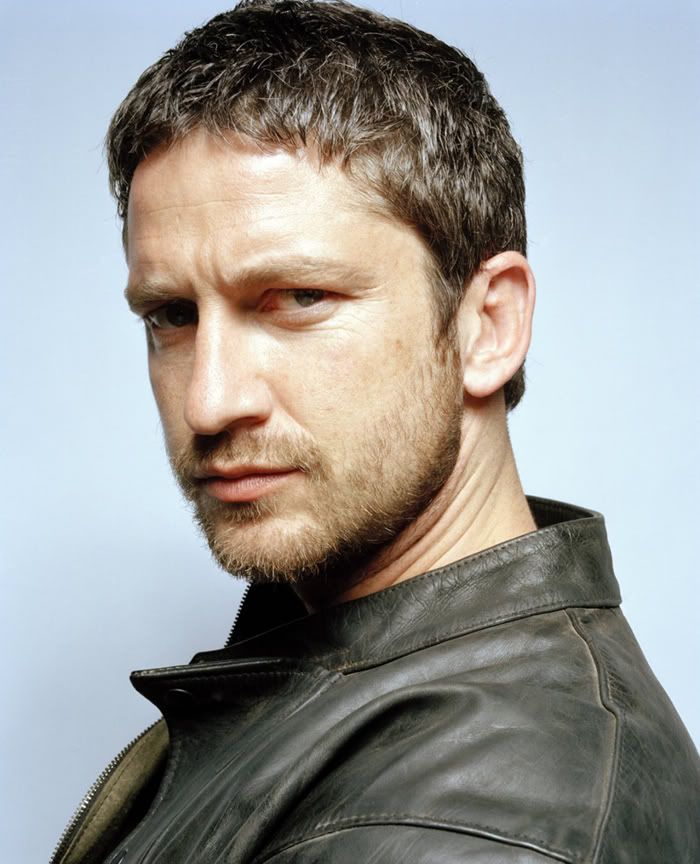
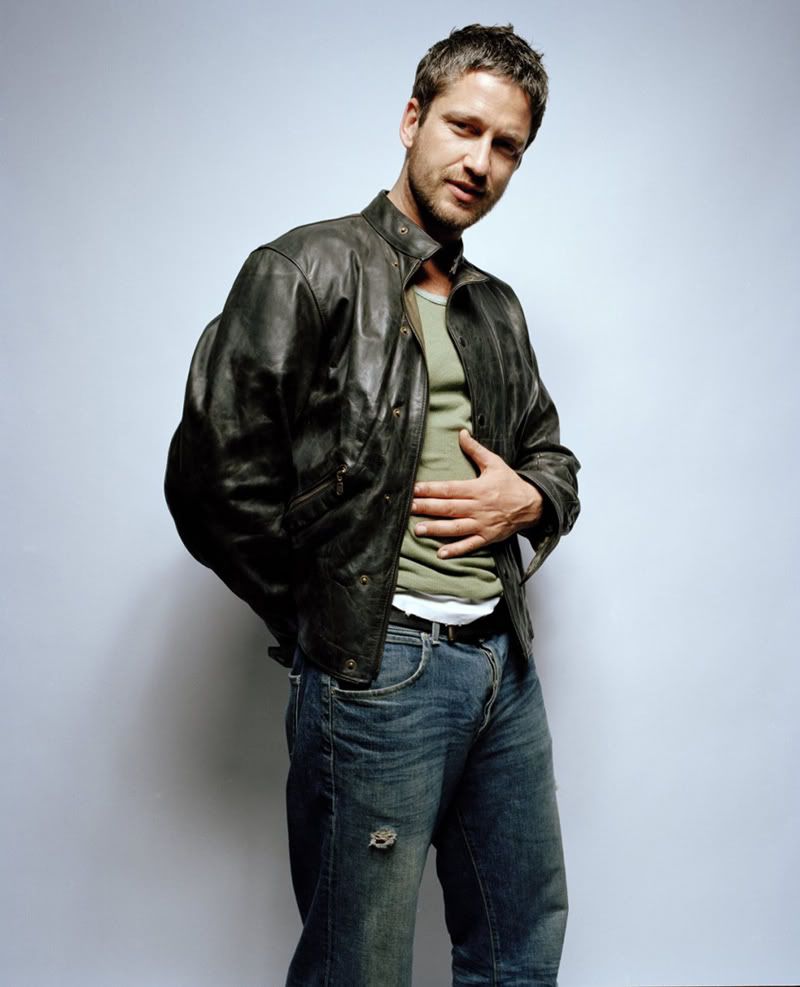
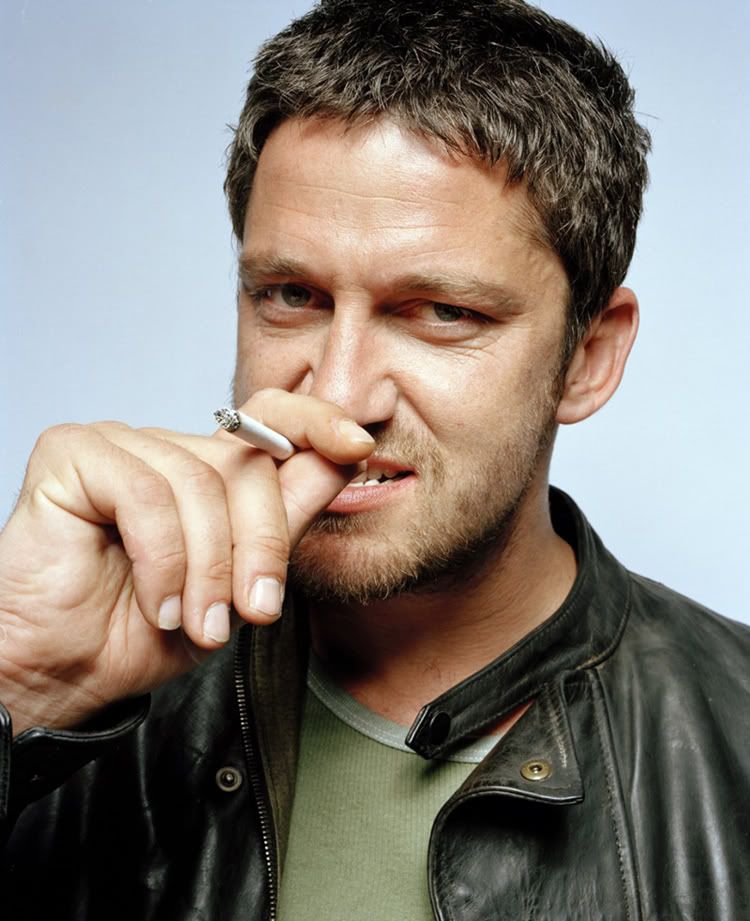
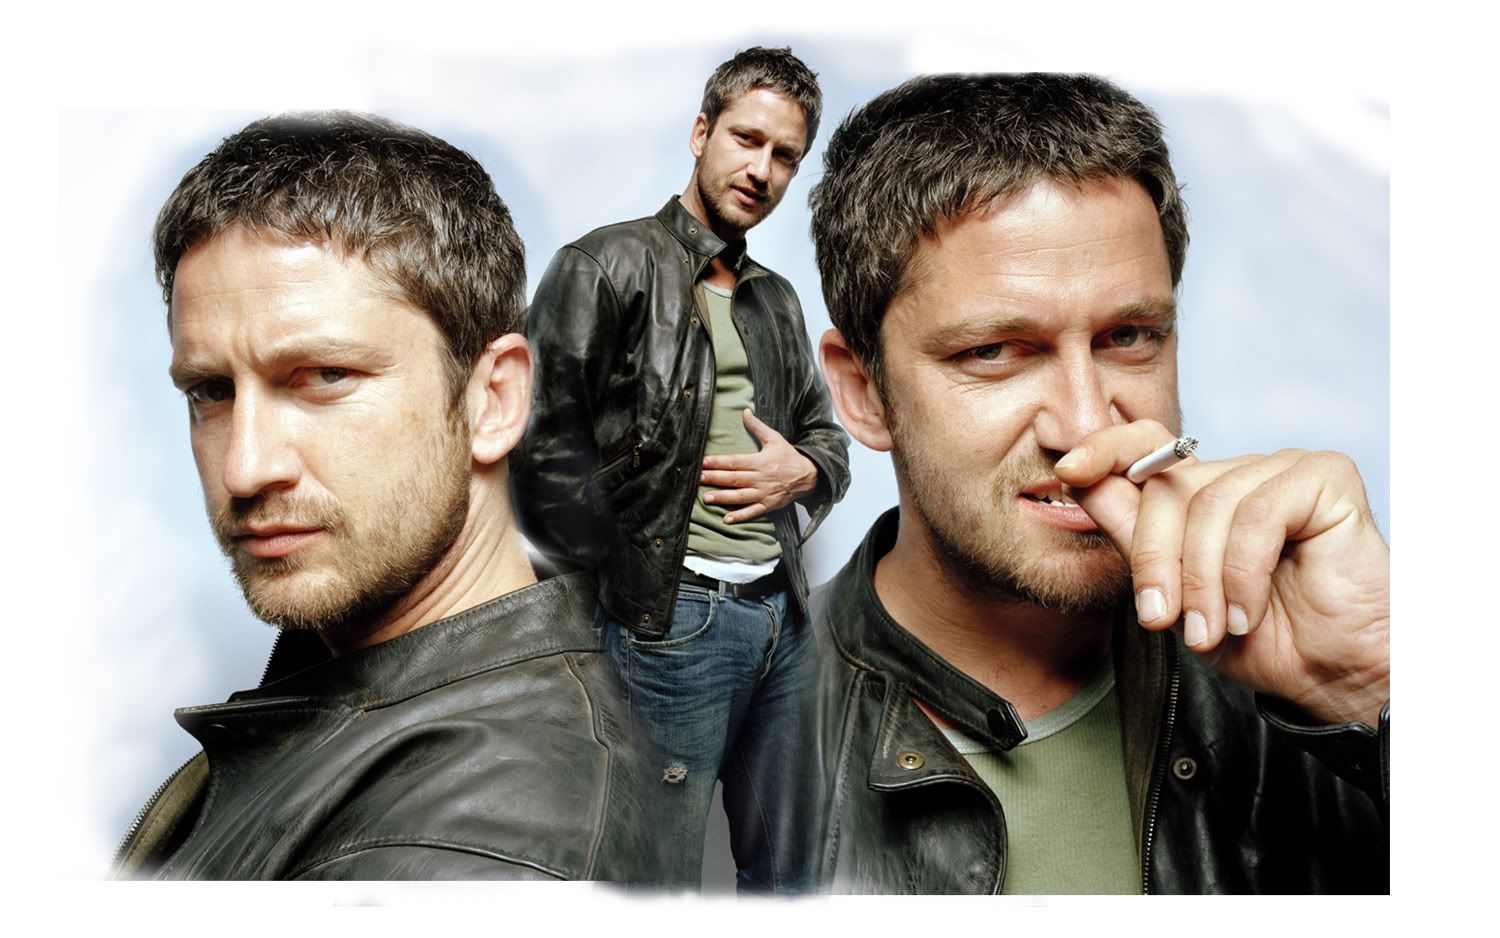
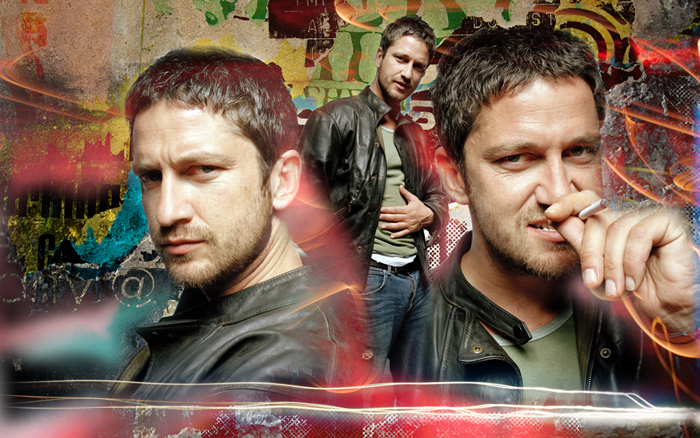
First I gather the pictures I think I might want to use in my wallpaper. I went with some pictures of Gerard Butler that are all from the same photo shoot and have the same background color. I've reduced them to the size I want to use them at on my wallpaper.
GB photo1
GB photo 2
GB photo 3
High Resolution photos from![[livejournal.com profile]](https://www.dreamwidth.org/img/external/lj-community.gif) hires_hunks
hires_hunks
I make a lot of icons and they are tiny. So, when I'm making a wallpaper I like to use large High Resolution Photographs or High Definition Screencaps. There is a lot to be said for the wallpapers with a wide expanse of textured background and a small picture. Yes, it looks artistic, it can convey a mood, or a scene, you have plenty of room for your desktop icons. I've made these types of wallpapers myself. But we're not going for any of that here. We're making a wallpaper of your favorite celebrity/actor/whatever. You want a closeup of that face. Don't you? We're going for "WOW!", look at his/her eyes, look at the expression on his/her face, look at those pores on his skin. Hee. It's the actor we want to see up close here, not a huge expanse of texture. So we are going to use large pictures and we are going to keep them large. Yay!
Choosing your Textures
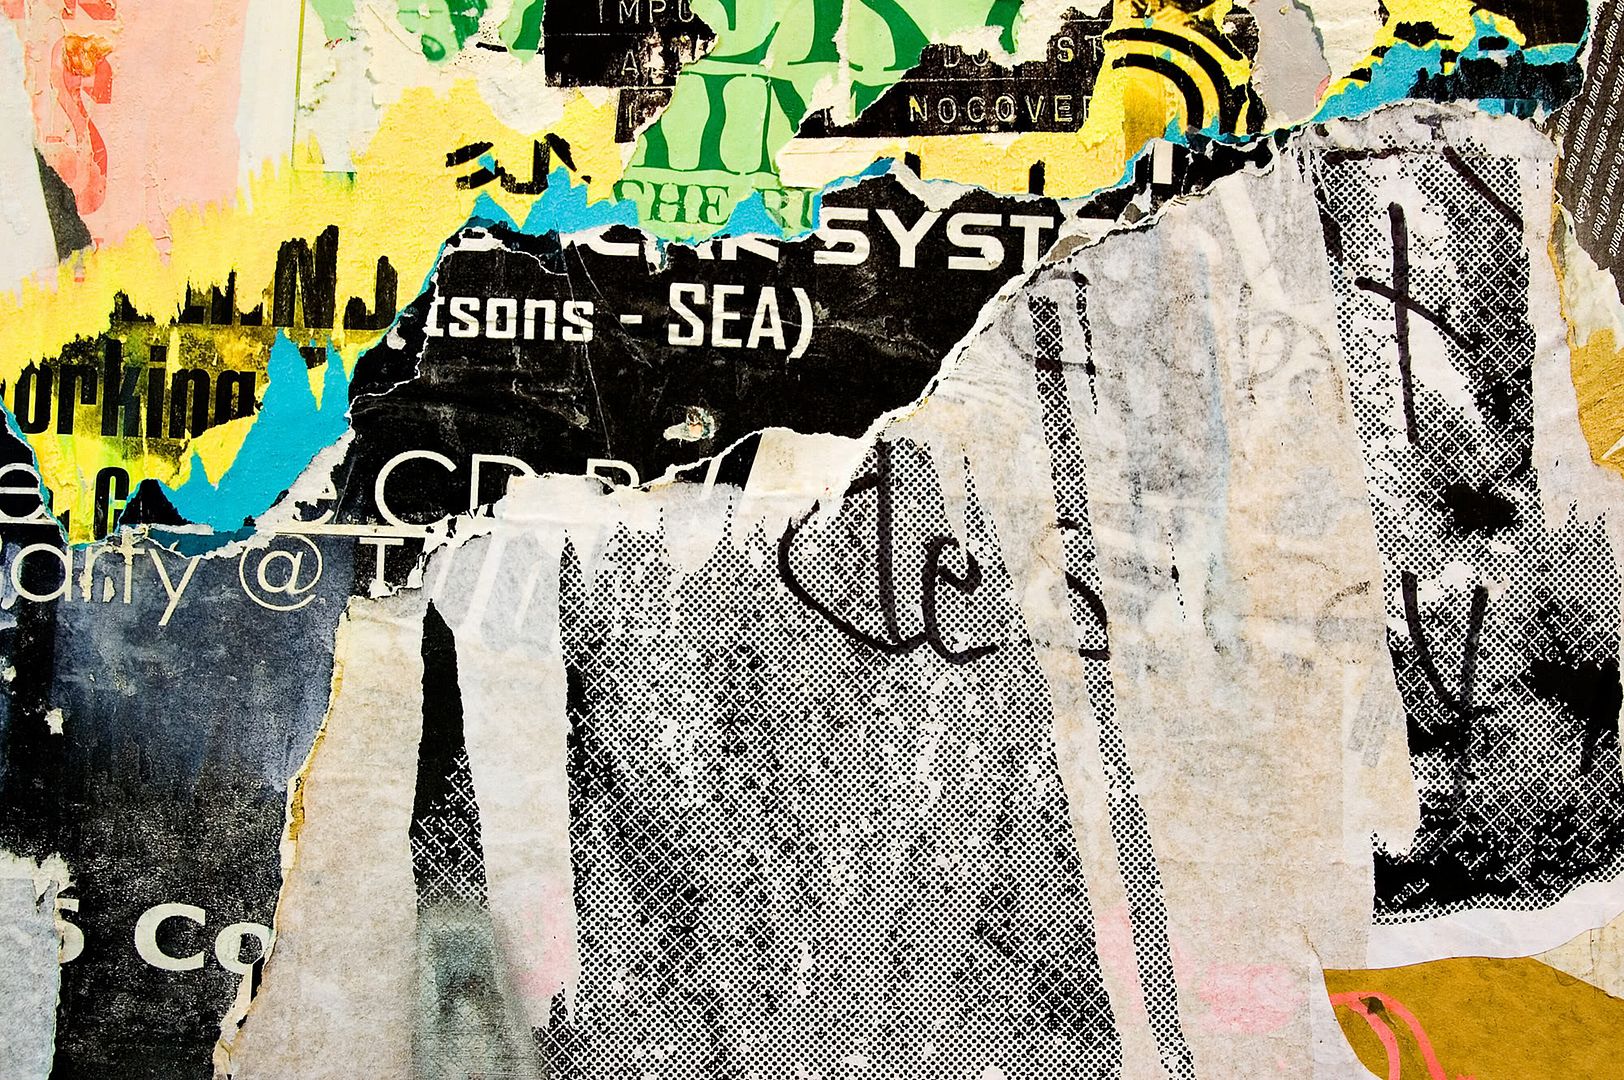
OK, let's set those pictures aside for a minute and think about our background. You could leave it a plain color if you like, but I wanted to do something rough and grungy with the background and the overall wallpaper. So I looked through my graphics files and picked out some huge pictures(we'll call them textures from now on) that I downloaded from www.stock.xchng.com.
I really recommend stock.xchng.com because it's free and they have the most enormous stock photos I have ever seen. If you know of another web site that lets you download huge photos for free I would love to know about it.
Click on the links to see the textures
Txtr1 Ripped Posters
Txtr2 Cement and Brick
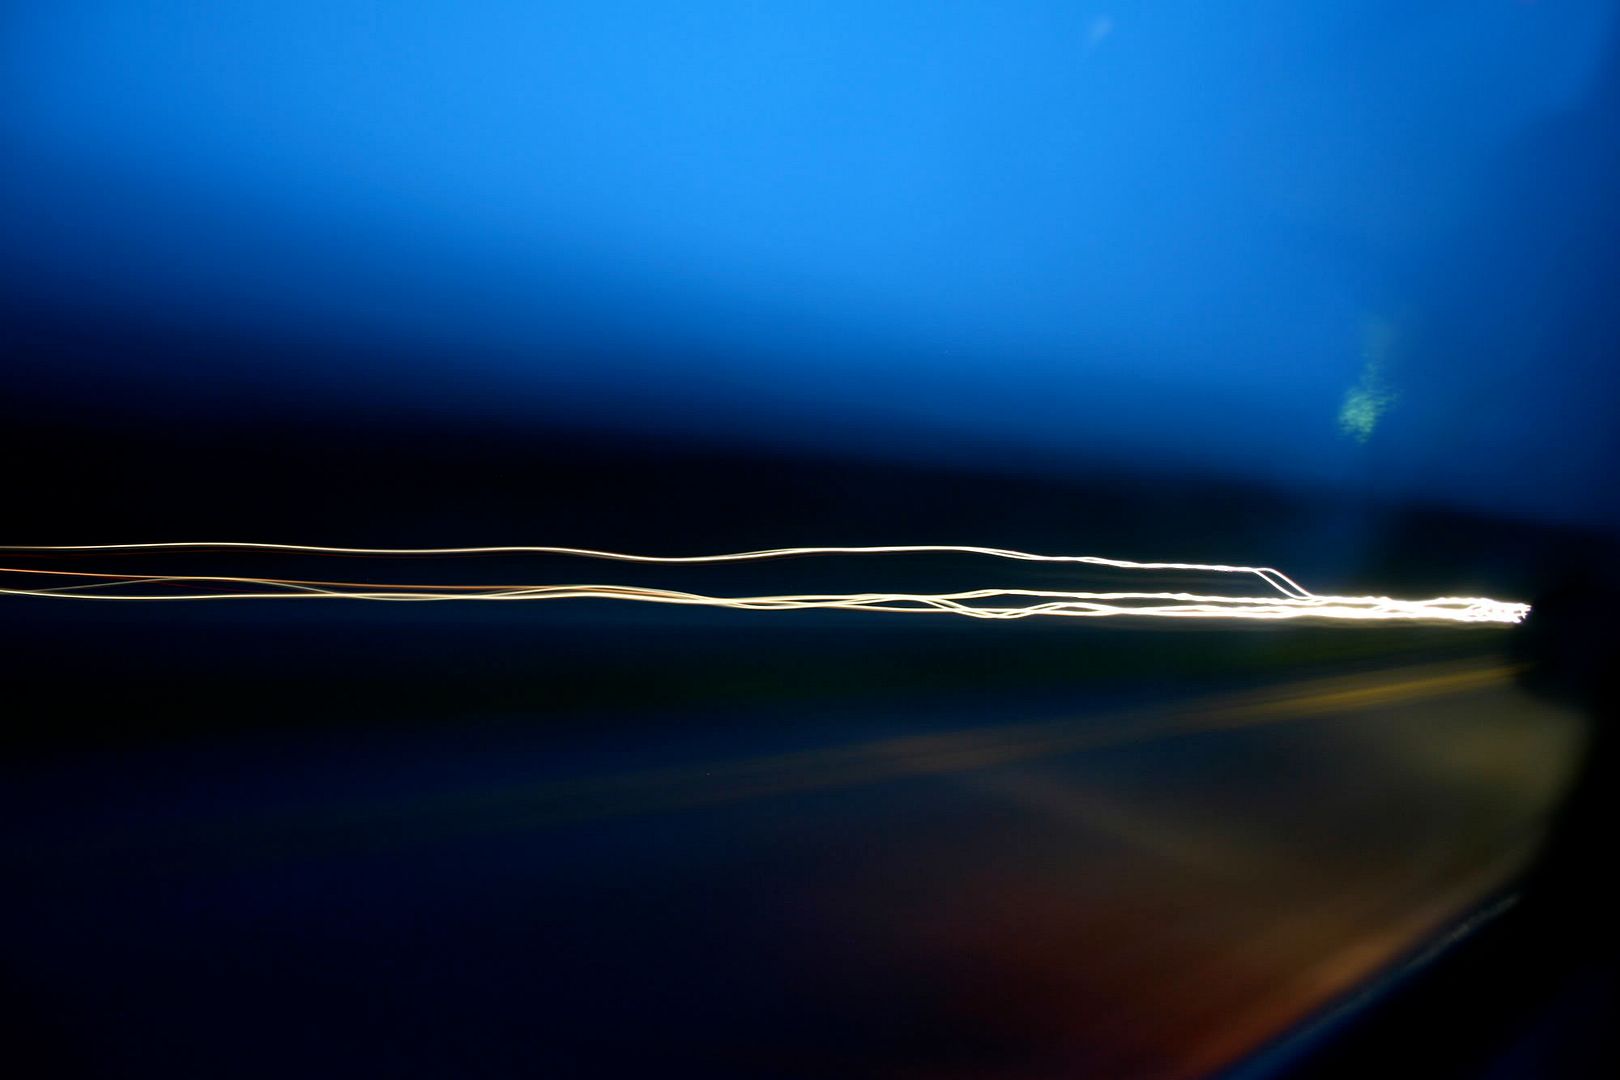
Txtr3 Light Streak
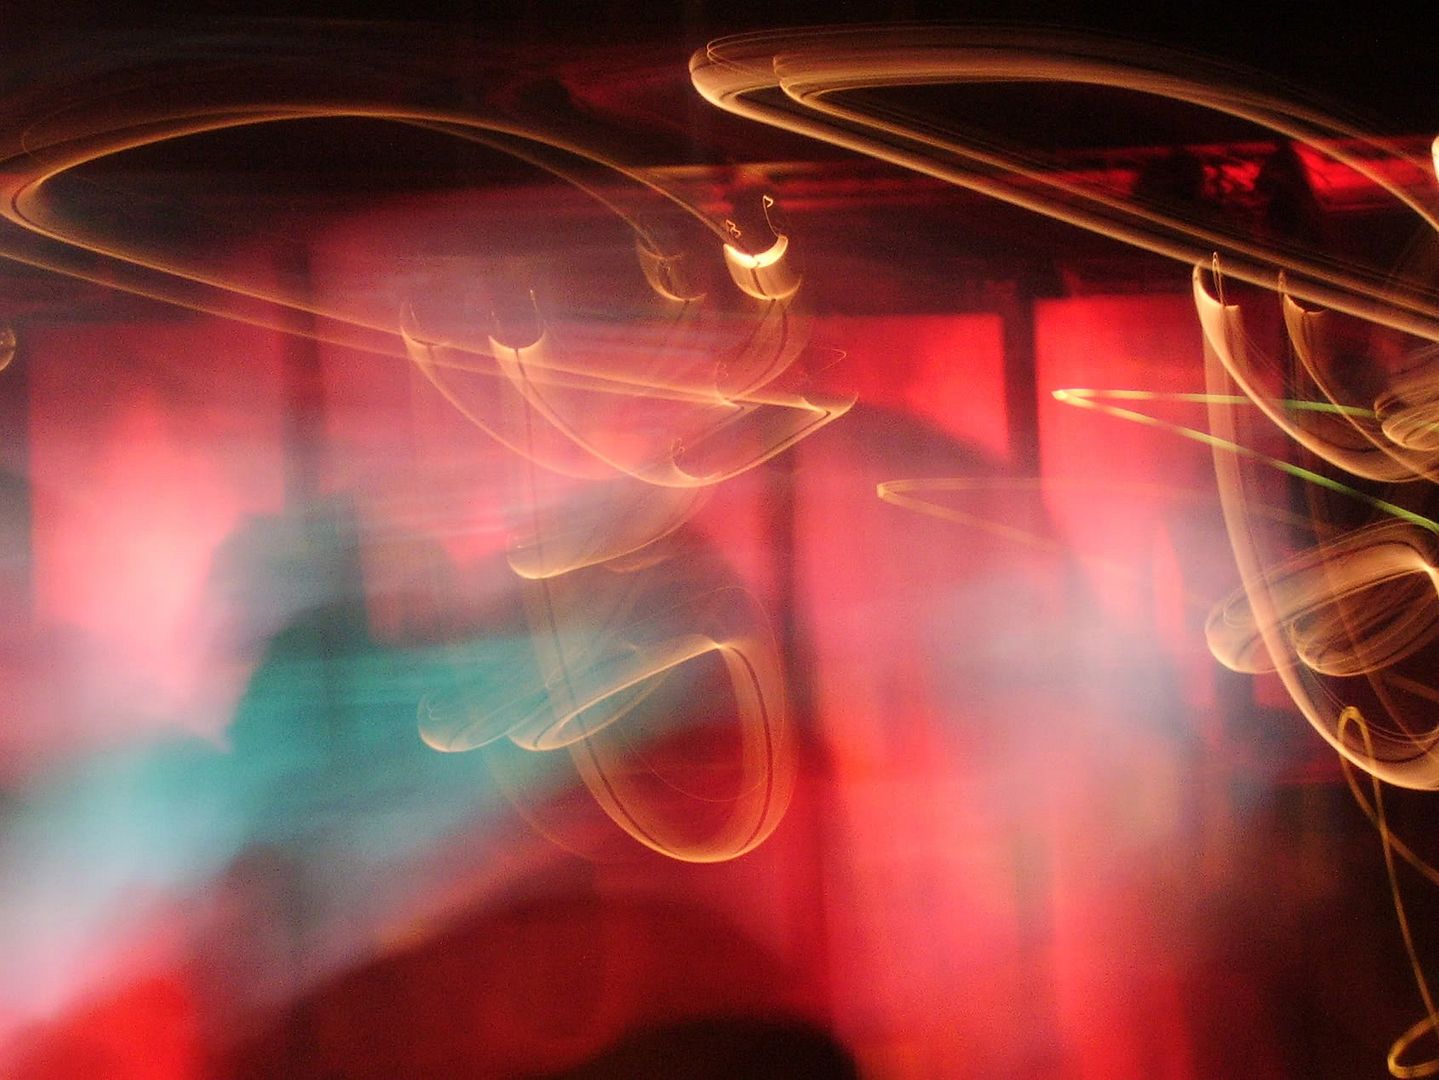
Txtr4 Red wash of light
These textures have already been reduced to the size I used them at in my wallpaper.
Let's get Started - Arranging your pictures onto your wallpaper
Open up your graphics.
Click on File>New
My New file/blank canvas is 1680x1050 pixels. Yours might be different. (Make sure your canvas is pixels and not inches.)
I have my Resolution set to 72
Color Mode - RGB Color
Background - it really doesn't matter because we are going to be adding a background. Some people like to start out with a transparent background. It's up to you.

Drag your pictures onto the blank canvas and arrange them however you want. The photo on the right with Gerry smoking a cig I flipped horizontally so that he's kind of facing the opposite direction to the picture on the left.

Each photo is on a seperate layer and they are overlapping each other. This is what you want because now your are going to start blending. I usually shift my main graphic to the right so that I will have empty space on the left for my desktop icons. You don't have to do this, it's up to you.
Blending Your Pictures
Now we can start blending the pictures together. This is the most time consuming part. I've decided to start with the photo on the left. Make sure it's selected.
In your color pallette your foreground color should be black and your background color white. Click on your brush tool. For this size graphic I started out with a "soft 65px round brush" and set the "opacity to 30%". Actually you're going to have to play around with the opacity and size of your brush. You'll see when you start blending. But this is a good place to start.

Now go to your "Layers pallette" and click on "Add layer mask" and you'll see a white rectangle appear in the layer you have selected.

Now you're going to start going over the areas of the photo you want to get rid of, or that you want to make partially transparent(this is where messing around with the opacity comes in). There is really no set order of doing this. My recommendation is that you experiment with different sizes and kinds of brushes and try setting them at different opacities. It's a lot of trial and error. Go slow and take your time.
Start on the straight edges on your photos and then gradually blend the rest of the photo into the background.
Ignore the colored background in this example. It's there so you can see the blending better.

Question: You might be wondering - why not just erase the parts you don't want? Why use the mask tool?
Answer: Because when you use the mask tool you can correct your mistakes very easily.
Go ahead and try it. Click on your "eraser tool". Select a brush, it doesn't really matter what kind, but you might as well stay with the soft round brush. Now go over one of the areas you just masked out and you will see it reappear. I know it makes no sense that the eraser tool would bring back your image, but what it is doing is erasing your previous brush strokes, if that makes any sense.
OK, let's switch back to our brush tool and keep working on blending our images.
What I do is I work on all my images at once. So I will add a mask to each layer and go back and forth between each one and blend till I get my images blended the way I want.
You have to make sure the layer you want to work on is selected and then click on the white mask rectangle to activate it. Then you can start blending.
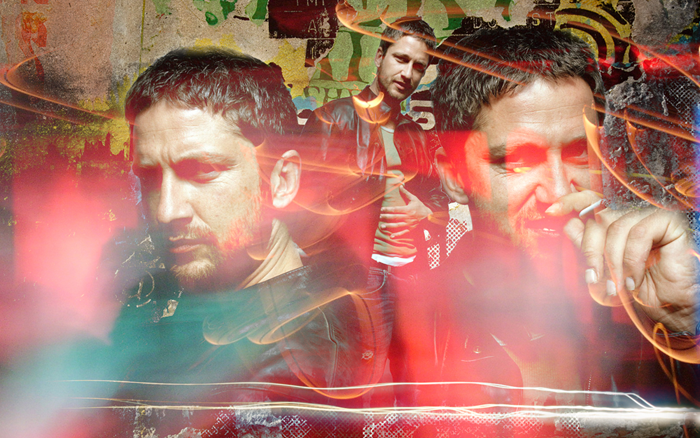
Pretty soon your wallpaper will start to look something like this. Click to see the large graphic

Keep working till you get rid of all the straight edges. Use a brush with a low opacity and go over Gerry's shoulders so that his legs in the middle picture show through. If you take away too much just use the "eraser tool" to correct it, bring it back.
Add a Textured Background
Once you have your pictures blended the way you want, grab your "Ripped Posters" texture(Txtr1 above) and tuck it beneath all your layers at the bottom. So it will be above your main background layer and beneath all your pictures/blended layers. Like this.

Now you can do some touching up on your blended layers if you need to. If you need to get rid of more of the blue background from the pictures go ahead and and do that.
Add a Textured Foreground
Now we are going to work with another texture and learn how to use "feather". I like to use "Feather" because it gives you a more gradual and natural looking fade to opacity. You'll see what I mean.
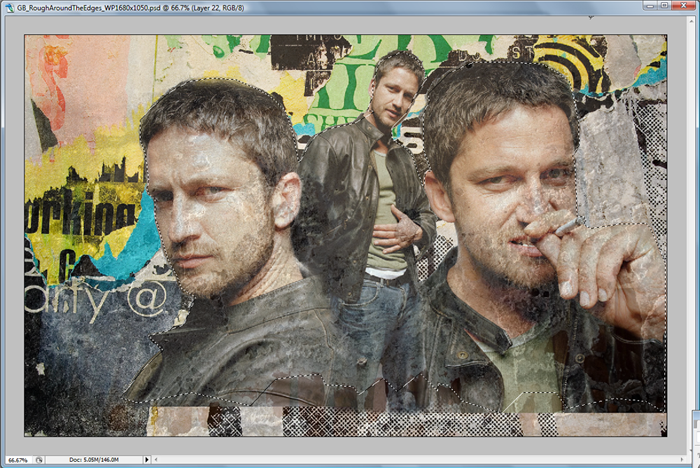
Grab the "Cement and Brick" texture(Txtr2) and drag it to the top of your canvas. Lower the opacity on this layer till you can see your layers beneath. Click on the "Polygonal Lasso Tool" and outline all your blended pictures. To use the "PLT" start outlining your object, then click, then move it some more to outline, then click. It takes some time and patience but it's worth the effort.
When you're done make sure you connect back to where you started. You should have something that looks like a dashed line of marching ants surrounding your pictures.
Click to see example - example4
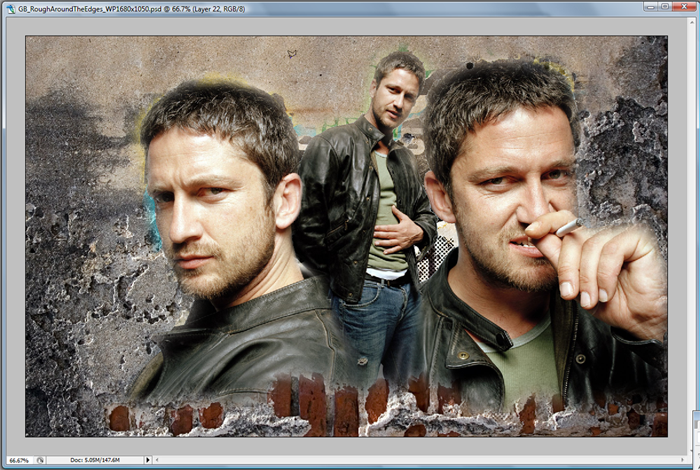
Now make sure the texture layer is selected.
Click on Select>Feather.
In the little box that pops up set the "Feather Radius" to 20.
Now tap the "Delete Key" on your keyboard.
Click on Select>Deselect to get rid of the marching ants.
Bring the opacity on the layer back up to 100% and have a look.
Click to see example - example4
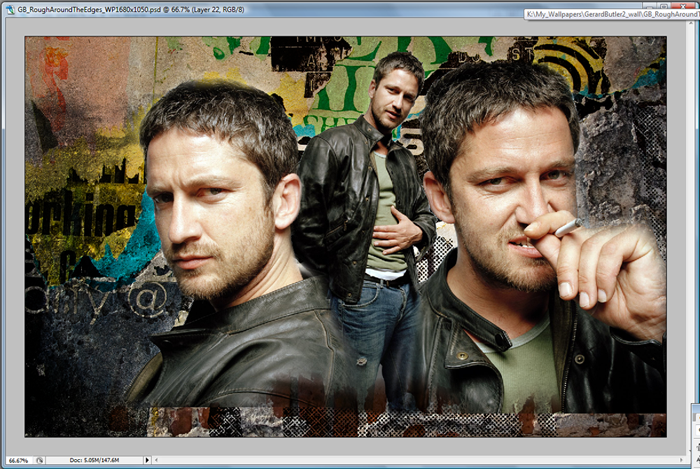
Now play with the blending mode on that texture layer. I set mine to "Multiply" at 100%.
Click to see example - example 6
If you need to erase more of the texture from your graphic use the "add layer mask" tool(as described above). I used it to erase some of the texture from his hand and face.
OK, grab the "Cement and Birck" texture(Txtr2) again and drag it onto the top of your wallpaper, above the same texture you just feathered. Set the blend mode to "Soft Light". "Add Layer Mask" and mask out the texture that is covering his faces, all of them and any other skin that is showing. You don't won't mottled looking skin. Unless of course you do, but I don't recommend it. (You can skip this part if you want.)
*deep breath* OK, are you still with me?
I am going to show you how I added the light textures.
Adding Light Textures
Grab the "Streak of Light" texture(txtr3) the blue one.
Drag it to the top of your graphic.
Set it to screen.
Get your "Polygonal Lasso Tool" out again and make a rough outline around the white streak.
Click on Select>Inverse
Click on Select>Feather
"Feather Radius" 20
Tap the "Delete Key" on your Keyboard.
Use your "Move Tool" to position the light streak over the straight line at the bottom of your blended pictures. Make a copy of the light streak layer and blur it.
Filter>Blur>Gaussian Blur - Set it so that it makes the streak layer beneath look like it's glowing.
Light Streak - example7
Grab the "Red wash of light" texture(txtr4) and drag it to the top of your wallpaper.
Set the blend mode to "Lighten" or "Screen". I set mine to "Lighten"
Now this is covering way to much of Gerry's face and other parts I want to show so I want to get rid of some of it.
Light texture covering the whole wallpaper - example8
You can use the "Polygonal Lasso Tool" along with "Feather" to erase chunks of the red light texture from your blended pictures and parts of the background a piece at a time. Kind of like what we did with the light streak except you don't need to inverse.
After I've feathered out parts of the light texture - example9
Do some extra stuff
That's the basics.
I did more to the actual pictures of Gerard. Just do whatever it is you do when you are making graphics of people. I added a "Selective Color" layer and I also duplicated all the Gerard layers, desaturated them and set the blend mode to "Multiply" at 30% opacity. This will all depend on your pictures of course and what look you are going for.
You can add some text. I used a font called Trashed for the text at the bottom and for Gerard's name I used a font called Monika.
You can also add some brushes. I added some grungy line brushes under the text at the bottom.
The last thing I did was duplicate all my layers. I made a new layer at the top of my wallpaper. Then press in order "alt + ctrl + shift + e". Then I set the blend mode to "Soft Light" at 50% opacity. I might have desatured it a bit, I can't remember.
~The End.~
If you have any questions or something is not clear please feel free to ask in a comment.
If this tutorial was helpful please let me know in a comment. I really like to get feed back on these things.
I hope I have helped some people to learn some new techniques and I also hope I've inspired you.
The wallpaper is up for grabs if you like it. You can find different sizes here. Please please comment and credit if you take it home with you.
I am going to do another blending tutorial using black and white photos on a black background. Kind of like my black and white Mick St. John wallpaper. Basically we'll be use the same blending techniques we've used here with a few differences, but since it's a black background it's a little easier.
Thanks for stopping by.endlessdeep
This tutorial is for
I'm wordy so be warned. But I think, if you're a beginner, the wordiness is helpful. But, I'll let you be the judge of that. :)
I use Photoshop CS2. You will learn how to use the "add layer mask" tool, the "Polygonal Lasso Tool" and how to "feather". I'm not sure if other graphic editing programs have the same tools, but they might have something similar. So even if you don't have Photoshop you might still be able to learn something from this tutorial or at the very least get some inspiration. I hope. :)
Beginners should be able to follow this tutorial. But, please don't look on this tutorial as a step by step tutorial. You will not be able to create the exact same wallpaper I have created. I'm going to show you where to find the tools I've used and how to use them, the rest is up to you. You can use the images I've used or use your own.
Most of the examples are linked and the graphics are reduced in size.
Gathering your photos
First I gather the pictures I think I might want to use in my wallpaper. I went with some pictures of Gerard Butler that are all from the same photo shoot and have the same background color. I've reduced them to the size I want to use them at on my wallpaper.
GB photo1
GB photo 2
GB photo 3
High Resolution photos from
I make a lot of icons and they are tiny. So, when I'm making a wallpaper I like to use large High Resolution Photographs or High Definition Screencaps. There is a lot to be said for the wallpapers with a wide expanse of textured background and a small picture. Yes, it looks artistic, it can convey a mood, or a scene, you have plenty of room for your desktop icons. I've made these types of wallpapers myself. But we're not going for any of that here. We're making a wallpaper of your favorite celebrity/actor/whatever. You want a closeup of that face. Don't you? We're going for "WOW!", look at his/her eyes, look at the expression on his/her face, look at those pores on his skin. Hee. It's the actor we want to see up close here, not a huge expanse of texture. So we are going to use large pictures and we are going to keep them large. Yay!
Choosing your Textures
OK, let's set those pictures aside for a minute and think about our background. You could leave it a plain color if you like, but I wanted to do something rough and grungy with the background and the overall wallpaper. So I looked through my graphics files and picked out some huge pictures(we'll call them textures from now on) that I downloaded from www.stock.xchng.com.
I really recommend stock.xchng.com because it's free and they have the most enormous stock photos I have ever seen. If you know of another web site that lets you download huge photos for free I would love to know about it.
Click on the links to see the textures
Txtr1 Ripped Posters
Txtr2 Cement and Brick
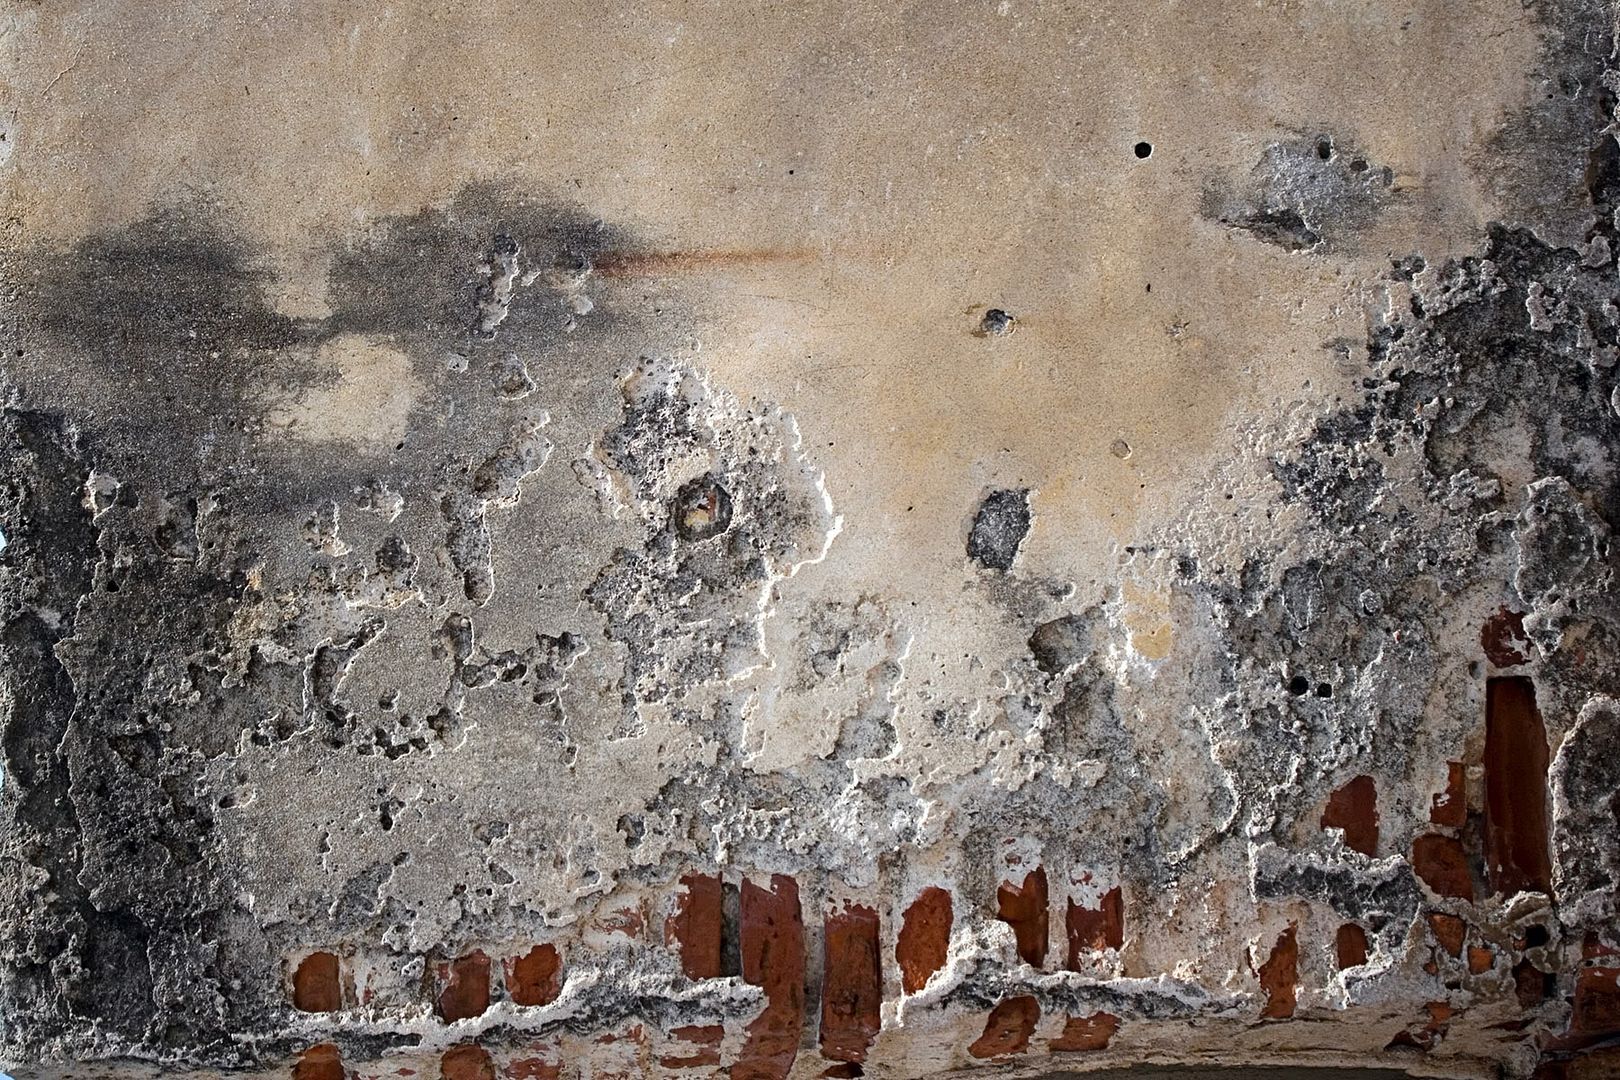
Txtr3 Light Streak
Txtr4 Red wash of light
These textures have already been reduced to the size I used them at in my wallpaper.
Let's get Started - Arranging your pictures onto your wallpaper
Open up your graphics.
Click on File>New
My New file/blank canvas is 1680x1050 pixels. Yours might be different. (Make sure your canvas is pixels and not inches.)
I have my Resolution set to 72
Color Mode - RGB Color
Background - it really doesn't matter because we are going to be adding a background. Some people like to start out with a transparent background. It's up to you.
Drag your pictures onto the blank canvas and arrange them however you want. The photo on the right with Gerry smoking a cig I flipped horizontally so that he's kind of facing the opposite direction to the picture on the left.
Each photo is on a seperate layer and they are overlapping each other. This is what you want because now your are going to start blending. I usually shift my main graphic to the right so that I will have empty space on the left for my desktop icons. You don't have to do this, it's up to you.
Blending Your Pictures
Now we can start blending the pictures together. This is the most time consuming part. I've decided to start with the photo on the left. Make sure it's selected.
In your color pallette your foreground color should be black and your background color white. Click on your brush tool. For this size graphic I started out with a "soft 65px round brush" and set the "opacity to 30%". Actually you're going to have to play around with the opacity and size of your brush. You'll see when you start blending. But this is a good place to start.
Now go to your "Layers pallette" and click on "Add layer mask" and you'll see a white rectangle appear in the layer you have selected.
Now you're going to start going over the areas of the photo you want to get rid of, or that you want to make partially transparent(this is where messing around with the opacity comes in). There is really no set order of doing this. My recommendation is that you experiment with different sizes and kinds of brushes and try setting them at different opacities. It's a lot of trial and error. Go slow and take your time.
Start on the straight edges on your photos and then gradually blend the rest of the photo into the background.
Ignore the colored background in this example. It's there so you can see the blending better.
Question: You might be wondering - why not just erase the parts you don't want? Why use the mask tool?
Answer: Because when you use the mask tool you can correct your mistakes very easily.
Go ahead and try it. Click on your "eraser tool". Select a brush, it doesn't really matter what kind, but you might as well stay with the soft round brush. Now go over one of the areas you just masked out and you will see it reappear. I know it makes no sense that the eraser tool would bring back your image, but what it is doing is erasing your previous brush strokes, if that makes any sense.
OK, let's switch back to our brush tool and keep working on blending our images.
What I do is I work on all my images at once. So I will add a mask to each layer and go back and forth between each one and blend till I get my images blended the way I want.
You have to make sure the layer you want to work on is selected and then click on the white mask rectangle to activate it. Then you can start blending.
Pretty soon your wallpaper will start to look something like this. Click to see the large graphic
Keep working till you get rid of all the straight edges. Use a brush with a low opacity and go over Gerry's shoulders so that his legs in the middle picture show through. If you take away too much just use the "eraser tool" to correct it, bring it back.
Add a Textured Background
Once you have your pictures blended the way you want, grab your "Ripped Posters" texture(Txtr1 above) and tuck it beneath all your layers at the bottom. So it will be above your main background layer and beneath all your pictures/blended layers. Like this.
Now you can do some touching up on your blended layers if you need to. If you need to get rid of more of the blue background from the pictures go ahead and and do that.
Add a Textured Foreground
Now we are going to work with another texture and learn how to use "feather". I like to use "Feather" because it gives you a more gradual and natural looking fade to opacity. You'll see what I mean.
Grab the "Cement and Brick" texture(Txtr2) and drag it to the top of your canvas. Lower the opacity on this layer till you can see your layers beneath. Click on the "Polygonal Lasso Tool"
and outline all your blended pictures. To use the "PLT" start outlining your object, then click, then move it some more to outline, then click. It takes some time and patience but it's worth the effort.When you're done make sure you connect back to where you started. You should have something that looks like a dashed line of marching ants surrounding your pictures.
Click to see example - example4
Now make sure the texture layer is selected.
Click on Select>Feather.
In the little box that pops up set the "Feather Radius" to 20.
Now tap the "Delete Key" on your keyboard.
Click on Select>Deselect to get rid of the marching ants.
Bring the opacity on the layer back up to 100% and have a look.
Click to see example - example4
Now play with the blending mode on that texture layer. I set mine to "Multiply" at 100%.
Click to see example - example 6
If you need to erase more of the texture from your graphic use the "add layer mask" tool(as described above). I used it to erase some of the texture from his hand and face.
OK, grab the "Cement and Birck" texture(Txtr2) again and drag it onto the top of your wallpaper, above the same texture you just feathered. Set the blend mode to "Soft Light". "Add Layer Mask" and mask out the texture that is covering his faces, all of them and any other skin that is showing. You don't won't mottled looking skin. Unless of course you do, but I don't recommend it. (You can skip this part if you want.)
*deep breath* OK, are you still with me?
I am going to show you how I added the light textures.
Adding Light Textures
Grab the "Streak of Light" texture(txtr3) the blue one.
Drag it to the top of your graphic.
Set it to screen.
Get your "Polygonal Lasso Tool" out again and make a rough outline around the white streak.
Click on Select>Inverse
Click on Select>Feather
"Feather Radius" 20
Tap the "Delete Key" on your Keyboard.
Use your "Move Tool" to position the light streak over the straight line at the bottom of your blended pictures. Make a copy of the light streak layer and blur it.
Filter>Blur>Gaussian Blur - Set it so that it makes the streak layer beneath look like it's glowing.
Light Streak - example7
Grab the "Red wash of light" texture(txtr4) and drag it to the top of your wallpaper.
Set the blend mode to "Lighten" or "Screen". I set mine to "Lighten"
Now this is covering way to much of Gerry's face and other parts I want to show so I want to get rid of some of it.
Light texture covering the whole wallpaper - example8
You can use the "Polygonal Lasso Tool" along with "Feather" to erase chunks of the red light texture from your blended pictures and parts of the background a piece at a time. Kind of like what we did with the light streak except you don't need to inverse.
After I've feathered out parts of the light texture - example9
Do some extra stuff
That's the basics.
I did more to the actual pictures of Gerard. Just do whatever it is you do when you are making graphics of people. I added a "Selective Color" layer and I also duplicated all the Gerard layers, desaturated them and set the blend mode to "Multiply" at 30% opacity. This will all depend on your pictures of course and what look you are going for.
You can add some text. I used a font called Trashed for the text at the bottom and for Gerard's name I used a font called Monika.
You can also add some brushes. I added some grungy line brushes under the text at the bottom.
The last thing I did was duplicate all my layers. I made a new layer at the top of my wallpaper. Then press in order "alt + ctrl + shift + e". Then I set the blend mode to "Soft Light" at 50% opacity. I might have desatured it a bit, I can't remember.
~The End.~
If you have any questions or something is not clear please feel free to ask in a comment.
If this tutorial was helpful please let me know in a comment. I really like to get feed back on these things.
I hope I have helped some people to learn some new techniques and I also hope I've inspired you.
The wallpaper is up for grabs if you like it. You can find different sizes here. Please please comment and credit if you take it home with you.
I am going to do another blending tutorial using black and white photos on a black background. Kind of like my black and white Mick St. John wallpaper. Basically we'll be use the same blending techniques we've used here with a few differences, but since it's a black background it's a little easier.
Thanks for stopping by.
no subject
no subject
no subject
no subject
no subject
no subject
no subject
no subject
no subject
no subject
no subject
adding it to my mems!
no subject
no subject
no subject
no subject
this is really gorgeous~
I will try it later^_____^
thakies~
no subject
no subject
no subject
no subject
♥
no subject
I love the icon you are using. Cute.
no subject
no subject
no subject
no subject
no subject
no subject
no subject
I do have a question though, how did you get such a crisp edge around the pictures without losing any of the detail? When I tried, if I got too close, it would take out part of the face :(
no subject
I'm glad you liked the tut. Thanks for commenting and you're welcome. :)
no subject
no subject
no subject
no subject
no subject
no subject
no subject
no subject
no subject
no subject
http://www.tunl.duke.edu/~kidd/nn_schedule.html
Thanks again! I'm adding this to memories.
no subject
Judith
no subject